WordPress Blogging

So, you want to start a WordPress blog?
Maybe you’re excited to get your voice heard, or want to use a blog to generate passive income?
Bloggers like Pat Flynn and Darren Rowse are proof that you can make an amazing amount of money with blogging, and become a thought leader in your industry.
THE COMPLETE SEO GUIDEA step-by-step guide on how to increase your traffic in 60 days or less.Learn how to practically build a successful website or blog.THE ONLY SEO GUIDE YOU WILL EVER NEED TO READ!
Taking Pat Flynn as an example, Pat’s worked on his blog since 2008 and is now making $132,000 every month — just by creating content.
Darren Rowse makes well over six figures annually with his blogs, leveraging his audience to sell products and get commissions through affiliate marketing.
The blog you are reading now is another example.
Started as a simple SEO Blog, it now generates enough leads and sales to run a profitable SEO business, in one of the most saturated industries online.
Whether you want a platform for your voice, or to create a passive income machine, you’re in the right place.
I’m not going to lie and say that it’s easy to build your blog to become profitable, but you have to start somewhere.
Professional bloggers make money because they’ve found a way to build an audience and sell that audience products on other people’s behalves (that’s affiliate marketing), sell their own products, or by selling ad space on their site…
But, the great thing for you is that you don’t have to worry about that yet.
In this guide, I’m going to teach you the process of setting up a WordPress blog from scratch.
I’m going to guide you through the 10 steps you need to go through to get started with your brand new blog.
So, if you are a beginner to WordPress blogging, get a cup of coffee and let’s see how blogging can literally change your life.
How to Start a WordPress Blog
- Step 1: Select and register the perfect domain name
- Step 2: Choose the best WordPress hosting
- Step 3: Install WordPress on your new host
- Step 4: Write and publish your first post
- Step 5: Learn how use the WordPress editor
- Step 6: Learn how to change the appearance of your WordPress blog
- Step 7: Install WordPress plugins
- Step 8: Write and publish the most essential pages on your blog
- Step 9: Learn how to make money with your blog
- Step 10: SEO Optimize your WordPress Blog
Why Choose WordPress as your blogging platform?
Before getting into the steps, let me explain briefly why you should choose WordPress as your blogging platform and not go with other platforms like wix, medium, blogger, square (to name a few), that are free and maybe a bit easier to use for beginners.
When it comes to blogging, it’d be unwise to start anywhere but your own domain.
That’s for a few reasons:
- It’s yours, now and for as long as you pay renewal fees.
- Domain authority. The sooner you buy a domain, the sooner you can start aging it and increasing its authority
- Links back to your Medium blog will do nothing for your SEO. Again, your own domain means the authority goes to you, not other people.
- You get full control over the design, content, and rules of your site.
And, when you’re hosting your own site, there’s no better option than WordPress.
WordPress is the most popular blogging platform
WordPress isn’t the only way to set up a website, but it is one of the easiest, most popular and SEO-friendly way.
RECOMMENDED FOR YOU:
Running a WordPress website? Then download this how to guide and learn how to optimize your website like a Pro.
Running a WordPress website? Then download this how to guide and learn how to optimize your website like a Pro.
Let me explain:
WordPress runs 26.4% of all websites globally.
WordPress is a content management system, which means it’s a piece of web software that sits one layer between you and the raw code of your site.
Without WordPress or another CMS, you’d need to manually code every page, upload blog posts to a FTP server whenever you wanted to publish a post, and you wouldn’t be able to take advantage of the huge community for support, plugins, and themes.
There are a few CMSs out there, but WordPress is the most popular by far.
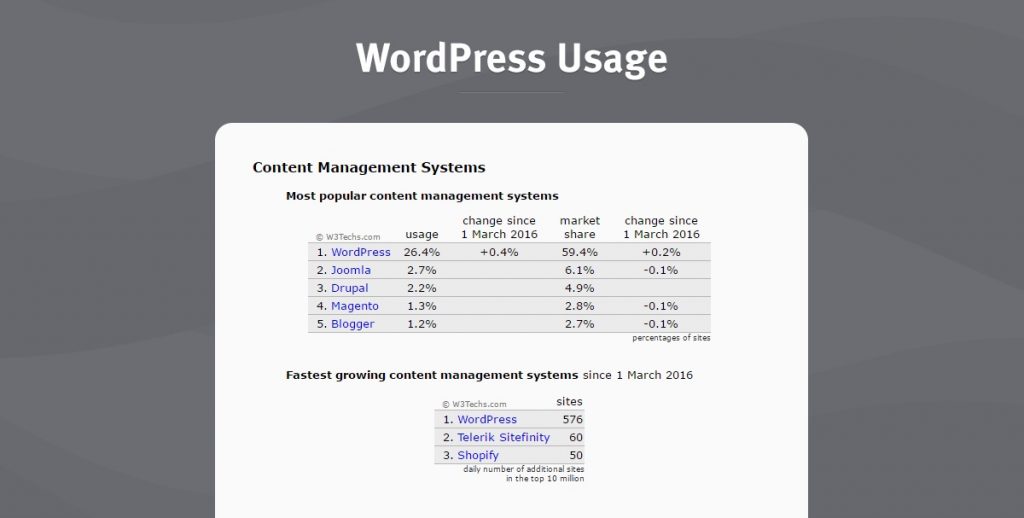
It runs over 66 million sites, including sites like Forbes, TechCrunch and CNN. With the amount of content these sites create and publish every day, you can be sure it’s good enough for a small starter blog.
WordPress is user friendly
If you’re not up to the challenge of coding a site from scratch or diving into the code of someone else’s template, WordPress is the way to go because it has every customizable option right there in front of you.
It makes switching around the look and feel of your site a quick task instead of a week-long project of trial and error as you learn to code.
It’s also easy to moderate comments, see your traffic, and expand your site’s functionality with the hundreds of thousands of available plugins.
WordPress is SEO-Friendly
The best thing about WordPress from a marketing perspective is that it comes SEO-ready.
This means that WordPress sites do some of the technical SEO for you, such as easy indexing in Google search, and support for a wide range of SEO plugins, such as Yoast and All in One SEO.
Without WordPress, you’d need to manually install analytics by tweaking the code on your pages, and ensure your HTML is properly optimized.
Avoid these issues and save time from the start by choosing WordPress.
Hint: Read Best WordPress SEO Practices for Beginners
The difference between WordPress.org and WordPress.com
One of the most confusing things for beginners (probably because the products are named so similarly) is the difference between WordPress.com and WordPress.org.
WordPress.org:
- Self-hosted: you need to pay for hosting from a service like BlueHost
- Fully customizable with zero limitations
WordPress.com:
- WordPress’ software using its own hosting service
- More expensive than some hosts available
- Limitations to customizability; you’re restricted to a pre-set amount of themes
My recommendation would be to set up WordPress.org through a hosting service. This way, you pay less and get more functionality for your money.
Ok, now that we all agree that WordPress is the way to go, let’s examine in more details the 10 steps for setting up a WordPress blog.
Step 1: Select and register the perfect domain name
Your domain is an essential part of your brand identity. It sets the tone for your site, and lets readers know what kind of content they can expect from you.
Here are the main considerations:
- Keep it as short as possible
- Make sure it’s easy to read, type, and remember (examples: yahoo.com, x.ai, apple.com)
- Add a keyword that’s relevant to your blog (examples: smartblogger.com, digitalmarketingpro.net)
- Don’t use hyphens or numbers — reading it out loud will be a nightmare
Another more complex consideration is your domain extension. For local SEOreasons, it can be a good idea to register something like co.uk if you’re in the UK.
That way, Google has a basic idea as to your relevance to a specific country.
However, in recent years, country-specific domain extensions have been used worldwide as a matter of preference.
For example, you’ll find plenty of tech companies with .io extensions (and you can bet they’re not all from British Indian Ocean Territory).
Why not head over to Bluehost now (the service I use personally), and pick your own domain name?
They have a range of extensions to choose from that could make for an awesome and memorable domain, such as .tech, .space, .club and .info.
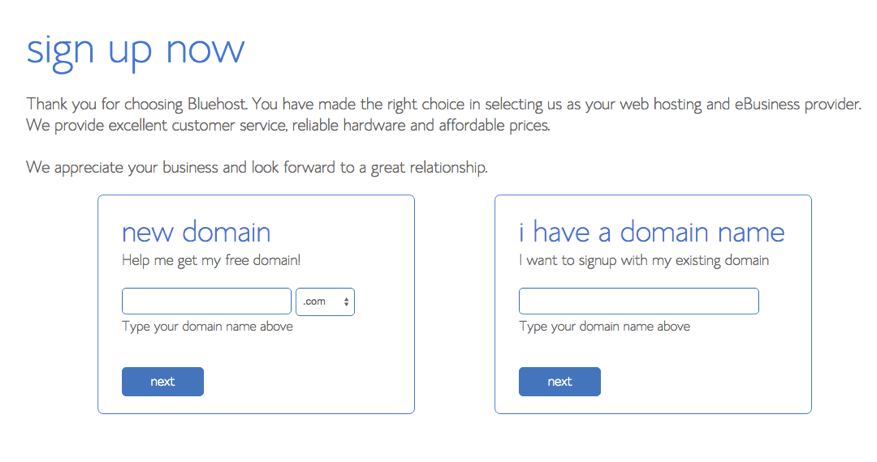
Registering a new domain is easy, just follow their on-screen instructions and you will be a proud domain owner in minutes!
Step 2: How to choose the best WordPress hosting?
Once you have a domain to use for your new WordPress Blog, the next step is to choose your hosting provider i.e. the company that will host your blog on the Internet.
There are plenty of factors (and even more options) to consider when picking hosting for your site.
First of all, you’re going to want to make sure the host is reliable, affordable, and offers support if you need it.
There are three kinds of hosting options available for your WordPress blog.
Shared hosting: pros and cons
Shared hosting is the most cost effective solution and perfect for hobby blogs that don’t get a lot of traffic.
Pros:
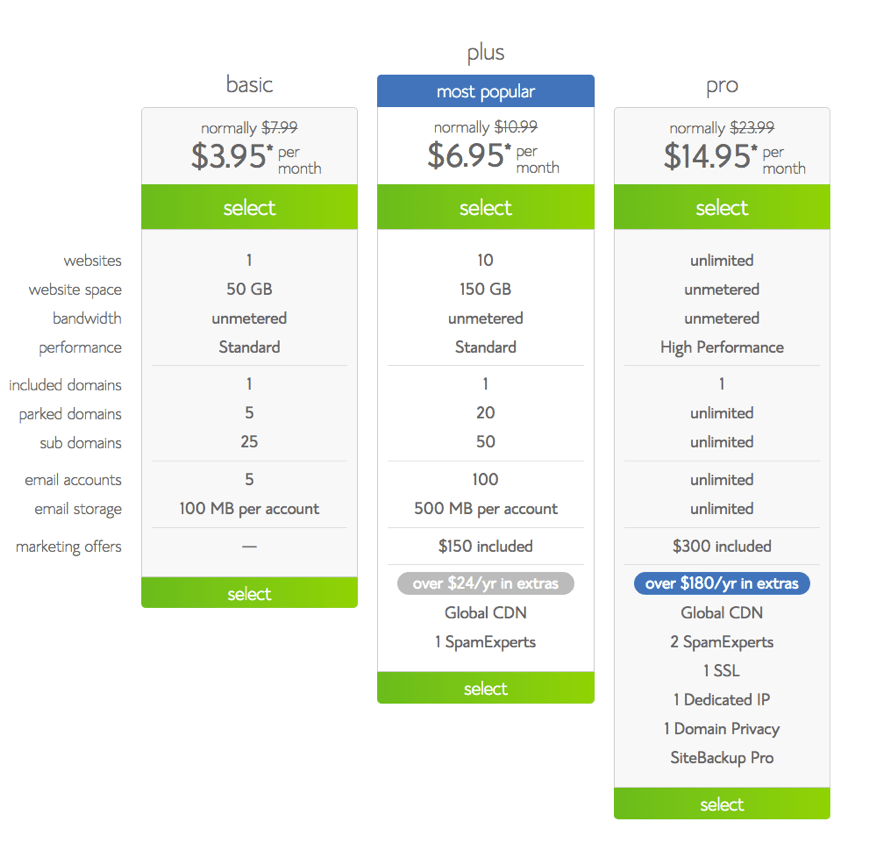
- It’s cheap. If you’re expecting less than 500 visitors per day, go with shared hosting from a provider like Bluehost for as little as $3.95/month.
- It’s easy to maintain. The server is shared with all kinds of other sites, so you will have your service managed along with everyone else.
Cons:
- It can be slow. Since you’re sharing hosting with hundreds of other sites, your site’s speed can be impacted randomly by demand for other sites on the server.
- Limited customer support. Shared hosting is cheap, so you can’t expect a high level of customer support.
VPS hosting: pros and cons
Virtual Private Server hosting (VPS) is the next step up from shared hosting.
Instead of sharing the server’s power with a lot of other people, you get your own space to work with.
Pros:
- Huge bandwidth and space. It’s all yours!
- Configure the server in any way you like. Add domains, customize settings, run apps on the server if you like.
Cons:
- Usually quite costly. Bluehost, for example, charges starting at $14.99/month.
- Pay for features you might not use. If you’re a beginner, you don’t need to functionality of a VPS.
Managed VPS hosting: pros and cons
Managed hosting is the top tier package you can get. With a managed host, you’re not responsible for any problems that might occur; you get a dedicated team to help you 24/7, and priority support to help you optimize your site from experts.
Pros:
- Top tier security. Never worry about backing your site up or getting attacked by hackers.
- Fast sites. Managed servers are known for optimized loading times because they use the best equipment available.
- White glove support. A huge part of the managed WordPress host experience is support; you get 24/7 help and advice with anything you might need.
Cons:
- It’s expensive. The most popular services, charge from $29/month for the their basic package.
My recommendation for hosting your first WordPress blog
For your first blog, anything more than shared hosting would be overkill.
You don’t need bandwidth to support a huge number of visitors. You don’t need any advanced options, either.
As you grow your blog and get more traffic, you will have to consider migrating to managed VPS hosting, from an SEO friendly hosting provider.
To get started in the fastest, most cost-effective way, use Bluehost’s shared plan which starts from $3.95/month.
Here’s how to get started:
First up, go to Bluehost.
Hit the ‘get started now’ button to pick your hosting plan. The basic plan is fine for now, and you can always upgrade later or even cancel within 30 days if you change your mind.
Follow the on-screen instructions to complete your registration of your new hosting account.
Step 3: How to install WordPress on your brand new host
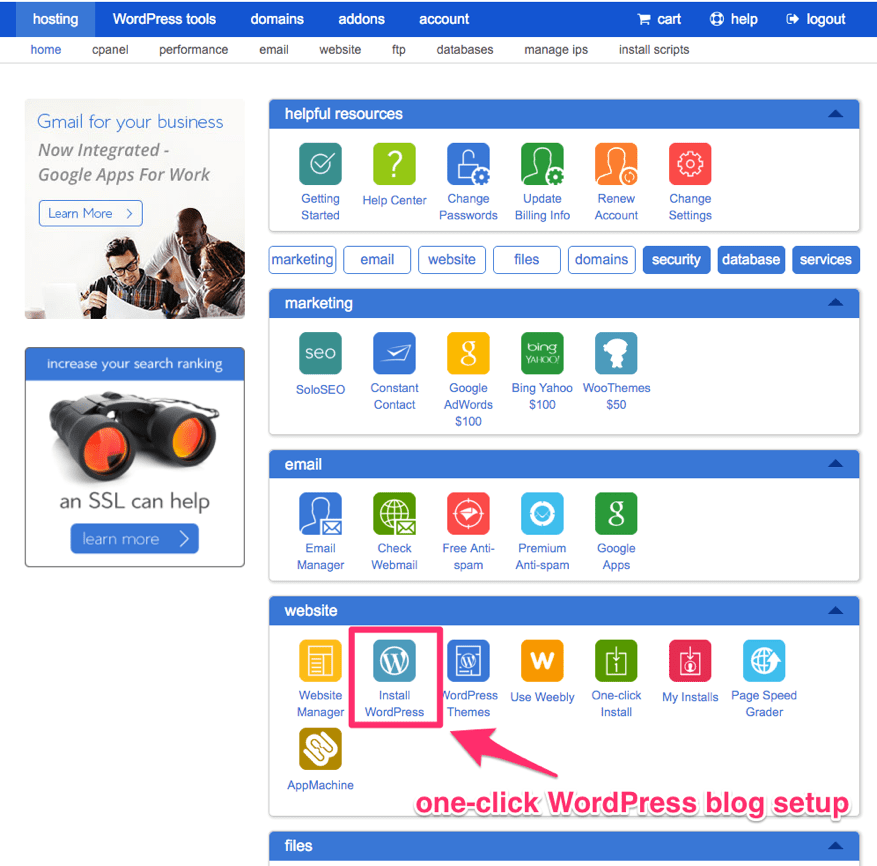
The great thing about handling your blog setup with Bluehost is that you can install WordPress in just one click.
Once you’ve made your purchase, just hit ‘Install WordPress’ and you’re ready to go!
Wait a little time, progress through the dialog boxes. Don’t worry, you’ll get prompted and kept in the loop every step of the way.
As soon as WordPress is installed, you’ll be asked to set up a username and password.
Make sure to use an extremely strong password, because it’s terrible to get your site hacked and it happens all the time.
If you’ve just registered example.com, then go over to example.com/wp-login where you’ll be asked for your username and password:
Exciting, right? You have a WordPress blog! A proper one, too. And that means you can start customizing your blog and publishing your first content.
Step 4: Write and publish your first WordPress post
Before getting into the details on how to publish your first post, you should understand some basic WordPress terminology.
The difference between WordPress posts and pages
It’s easy to get confused about posts and pages if you’re new to WordPress.
They look similar on your site, the editor is the same inside WordPress, and they’re created in a similar way in the interface.
To explain the difference, let me use an example:
If you wanted to publish a blog post, you’d use a post. WordPress will place new posts at the top of your blog, like you’d expect.
If you wanted to publish an about page, or your contact us page, you’d use a page.
Pages don’t appear at the top of your blog like a post. They’re one-off, timeless content that isn’t included in your RSS feed or with comments enabled.
You wouldn’t want to start a conversation on your privacy policy page, would you?
Pages are also hierarchical. This means you can have pages inside pages.
For example, if you had example.com/free-ebook and wanted to make a download page for people to visit to download the ebook, you’d make a subpage on the URL example.com/free-ebook/download.
As a general rule of thumb:
- Use posts for the dynamic parts of your website (i.e. your articles) and pages for the static content (i.e. about us page, contact us, etc.).
- Have in mind that posts and pages are not the same as categories and tags.
Step 5: Learn how to use the WordPress Editor
Write and publish your first post
Now it’s time for the most exciting part of blogging: publishing a post.
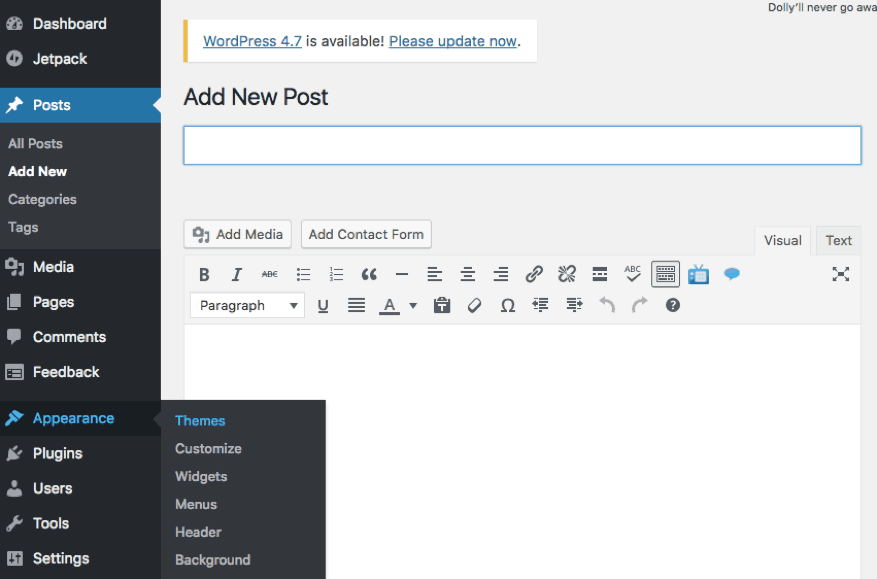
On the left-hand menu, hover over ‘Posts’ and choose ‘Add new’.
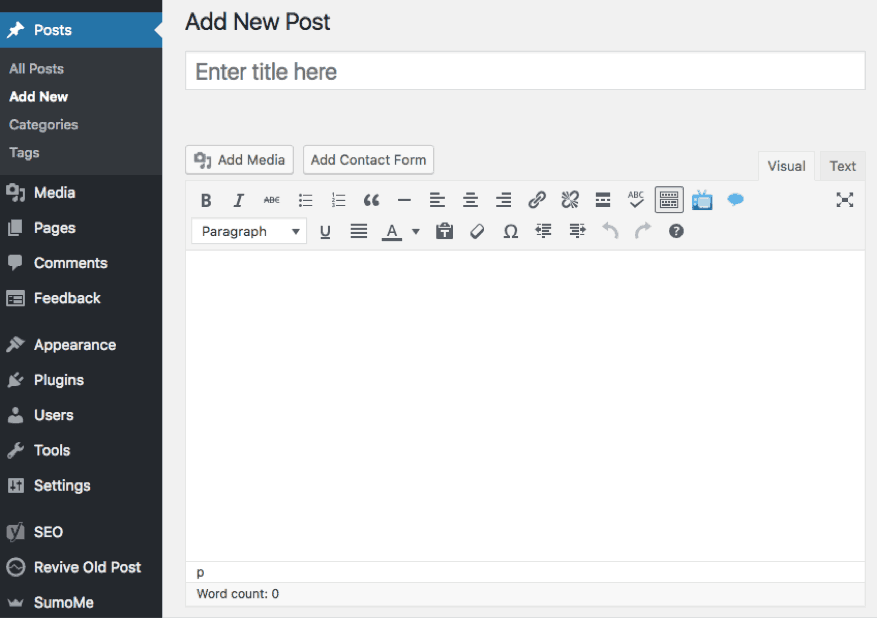
Here you can add your title and body text, and drag in images and videos.
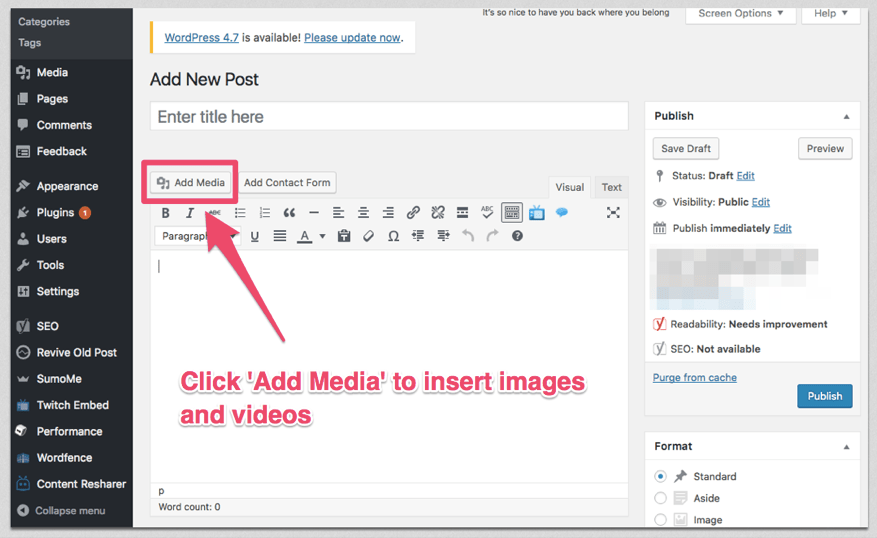
Adding an image is easy. Just click ‘Add Media’:
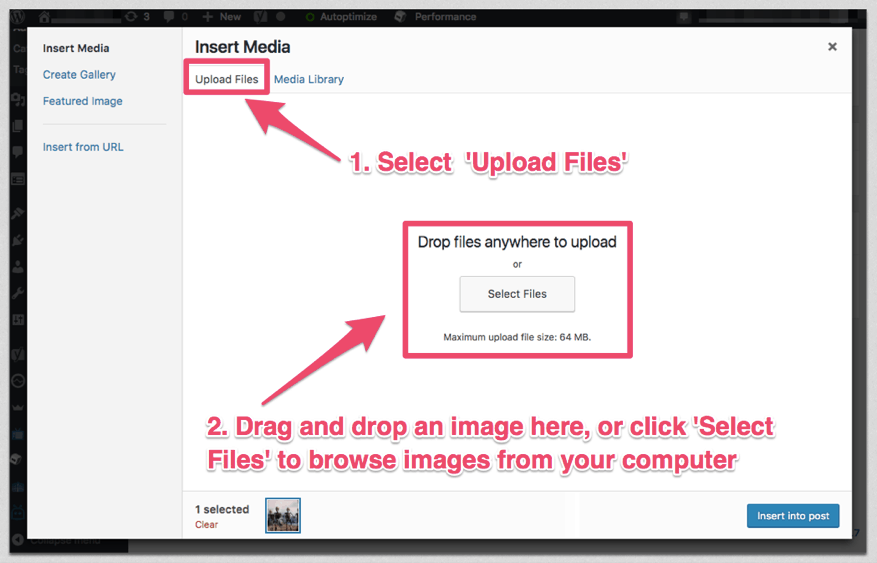
Once on the next screen, you can drag files into the window or browse from your computer:
Saving post drafts and previewing
At any point, you’re free to save your post as a draft if you want to come back to it later and edit it.
Don’t worry about losing anything you write in WordPress, because it will always save your drafts automatically, too.
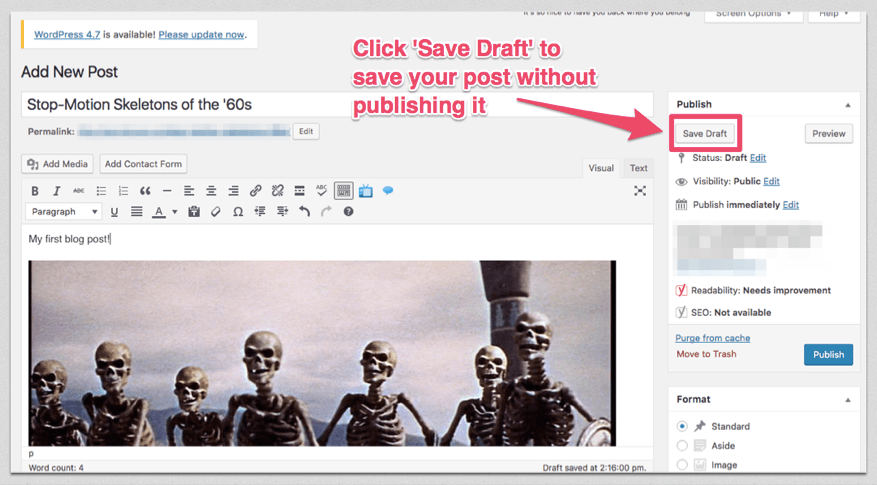
Make sure you preview the post before hitting publish to check for errors.
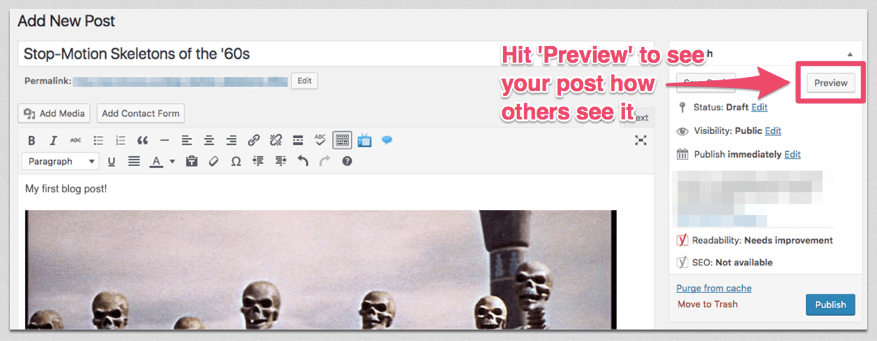
When you’re sure it’s ready to go, hit the big blue publish button to unleash your first blog post on the world!
Why not load up your site in another tab now to check it out?
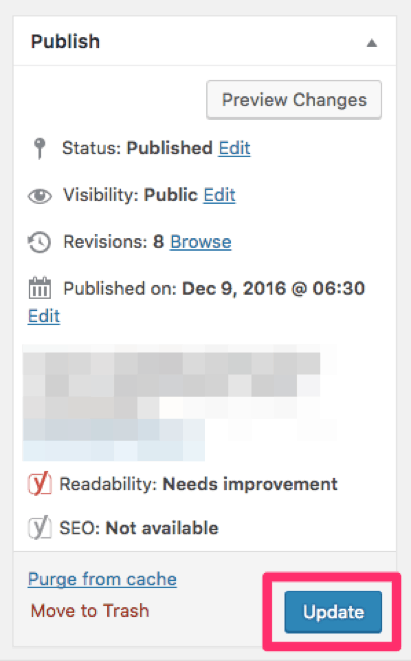
Editing and updating posts
Another great thing about WordPress’ post editor is how easy it is to update your posts once they’re published.
The best blogs always keep their old posts updated so they can provide up-to-date value to their new readers that come in from search engines.
To update a live post, go to ‘Posts’ on the lefthand sidebar and just go in and make edits.
When you’re editing something live, you’ll notice the publish button changes to an update button:
A quick tip for when you’re writing inside WordPress: use a tool to check your spelling and grammar.
For that, I’d recommend using Grammarly. It doesn’t just catch simple mistakes; it can detect problems with sentence structure and punctuation, too.
You’ll soon get into the flow of publishing posts regularly, and keeping your blog maintained. But that isn’t all there is to blogging.
Step 6: Change the appearance of your WordPress blog
When previewing your first WordPress blog, you will notice that it comes with a default theme, that has a specific look and feel.
While there is nothing wrong with that, if you want something different which is also more professional and flexible, you need to consider investing your first $100 in purchasing a professional WordPress framework and theme.
Let’s take it step by step:
What is a WordPress framework?
A WordPress framework is a set of designs and components you can use to customize the look and feel of your site.
Unlike free themes — which are often restrictive in their customizability — frameworks empower you to customize your site in a flexible way.
You can think of a framework as a layer that sits on top of WordPress and gives you extra functionality, better security and more flexibility.
An example of a powerful WordPress framework that helps you create websites of any kind is StudioPress’ Genesis framework.
What is a WordPress Theme?
A WordPress theme defines the appearance of your blog.
A theme includes the design layouts for the different pages of your blog, fonts, colors, formatting styles and everything that is related to the visual appearance of your blog.
WordPress themes are either free or paid (premium).
Free vs. Premium themes
Whether you can get away without paying for a WordPress theme is a question you’ll tackle the moment you come to choose a theme for your blog.
So, what’s the answer? Is premium always best?
In general, yes. Premium themes will come with rich customizability options, support, and security.
Theoretically, it is possible to use a free theme and the right concoction of random plugins to get a similar effect, but it’s in no way recommended because you never know how good the theme or plugins will hold up against hackers, or interact with each other.
Use a free theme if…
- You don’t have the budget for a premium theme (Usually $100)
- You’re happy with using the theme ‘as is’ with limited customizability
- You’re willing to risk security vulnerabilities or choose only from the approved WordPress theme repository
Use a premium theme if…
- You have a specific idea of how you want your site to look and you want a fully customizable starting point
- You value support and advice on how to edit your theme
- You prefer a high level of design quality
- You want to reduce the number of vulnerabilities on your site
There are plenty of fully customizable themes available through the Genesis framework, including clean and professional blog themes Foodie Pro and Digital Pro:
Read more about Foodie Pro.
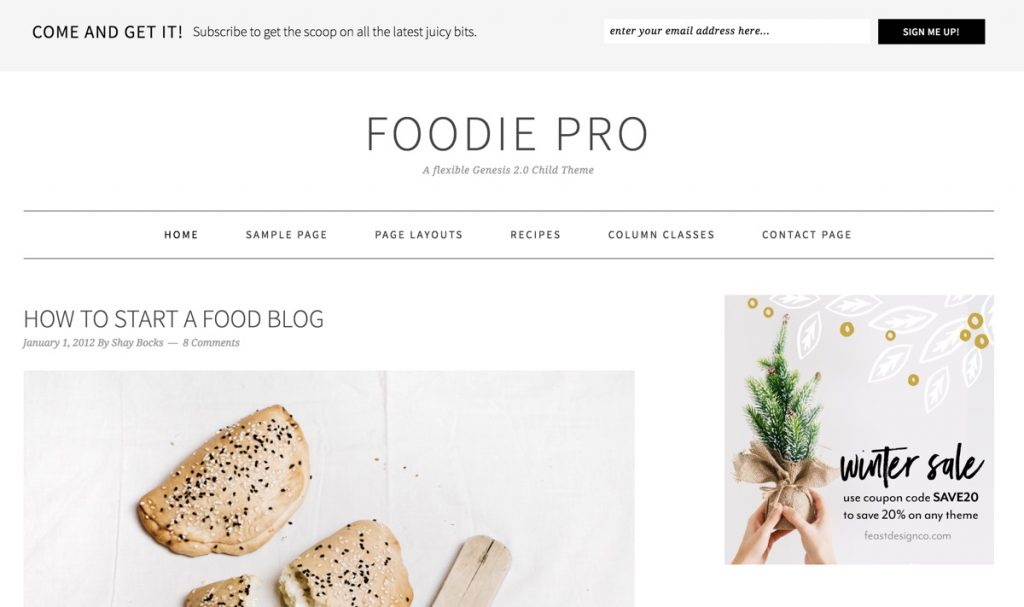
Read more about Digital Pro
or see all of StudioPress’ Genesis framework themes here.
When you use a free theme without a solid framework, you open yourself up to a lot of hassle if you make any mistakes while editing code.
I know people who have accidentally wiped their sites repeatedly because they were using low quality themes they’d found somewhere on the internet.
Frameworks like the Genesis framework put you in safe hands with a high level of security and support.
How to install a free WordPress theme
To select a theme from WordPress’ theme library, hover over ‘Appearance’ on the left-hand menu, and click ‘Themes’:
Click ‘Add new’, and you’ll find all kinds of themes to choose from.
If you’ve got a particular style in mind, you can click the ‘Feature filter’ button, and narrow it down by its purpose, layout, and features.
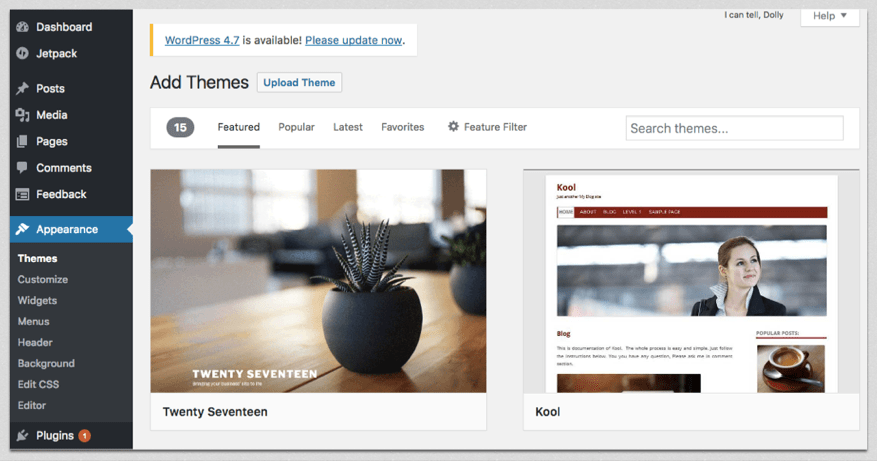
Click on any theme you’d like to use to install and activate it. Now go to your site to see how it looks!
If you don’t like something about your theme, you can try to edit it with the available options found in the Appearance > Customize menu.
If you have development experience, you can even try to adjust the code by reading your theme’s documentation. (Be careful editing code in Editor, however, because one wrong line can break your whole site.)
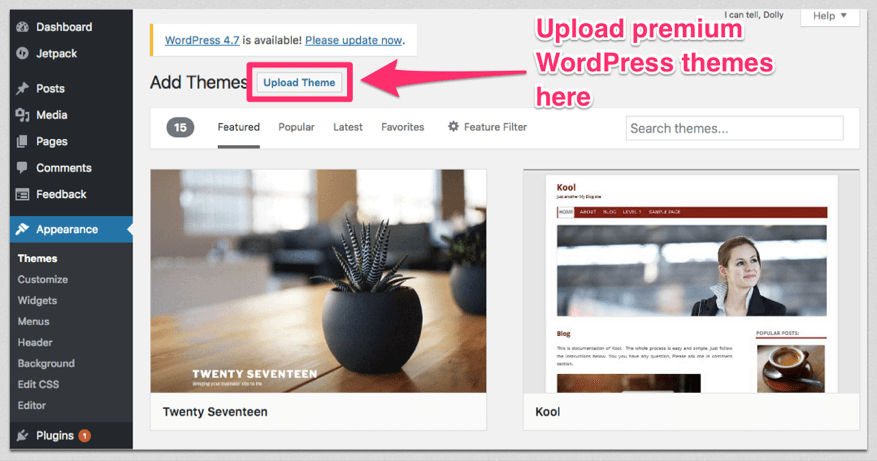
How to install a premium WordPress theme
When you buy a premium theme, you’ll download it from the store as a .zip file.
Unlike free themes you can access from inside of WordPress, you can’t just one-click install .zip files; you need to go into Appearance > Themes > Add New and click ‘Upload Theme‘:
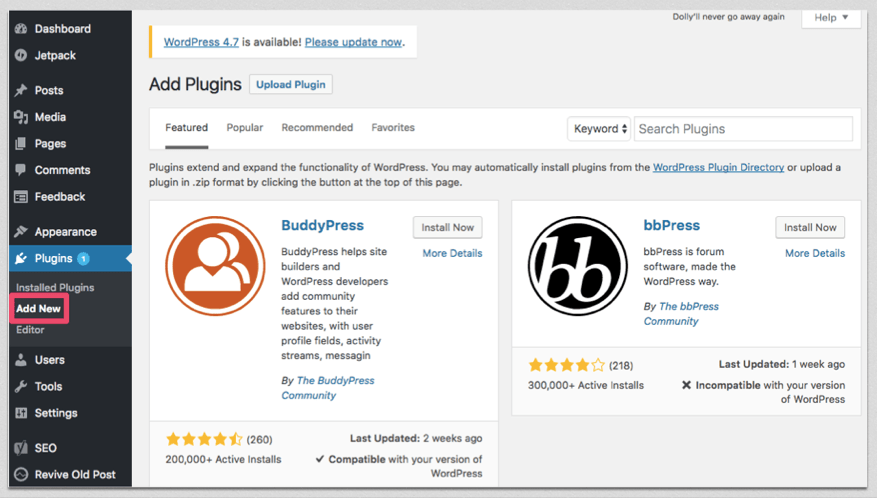
Step 7: Install WordPress plugins
In addition to themes, you can alter the functionality and appearance of your blog by using plugins.
What are WordPress plugins?
WordPress plugins are one of the single biggest factors why WordPress blogs are so powerful.
They add new features and functions to your blog without making you write or edit a single line of code.
Want to enable comments with Facebook? Show social sharing buttons? Backup your whole site in one click?
Plugins can do it all.
And, they’re easy to install from inside your site’s WordPress back end. Just click on ‘Plugins’ from the left-hand menu:
Now you know how, which plugins will you choose?
Here’s a list of essential (Free) WordPress plugins you should use on your new blog:
WP Super Cache
Cacheing is essential for WordPress sites because it reduces the size of your webpages.
This puts less strain on the user’s internet connection and your server, and even improves your SEO.
WP Super Cache is created by Automattic — the same company that builds WordPress — so you know it’s trustworthy.
BackUpWordPress
Your data is precious, and the longer you have your blog and put time into it, the bigger the risk becomes of losing it all.
With a backup plugin like BackUpWordPress, you never have to worry about losing data or having your site ruined.
If anything goes wrong, just restore your site from the most recent backup!
Yoast SEO
Even though WordPress is set up for technical SEO out of the box, you will want to use Yoast so you can write your own meta descriptions, get on-page SEO guidance as you write, and rank more easily in search engines.
Even the free version of Yoast is a massive step up from vanilla WordPress SEO functionality.
Contact Form 7
Need forms on your site? Maybe you want to make sure you have an easy way for leads to get in touch with you, or to collect their information?
With Contact Form 7, you get shortcuts to easily add forms anywhere on your site without having to type any difficult code.
Free vs premium plugins
Most of the plugins I’ve mentioned above, like Yoast and WP Super Cache, have premium versions you can choose if you want extra features.
The catch with these examples (and most premium plugins you’ll come across) is that you’re unlikely to need the advanced features premium plugins offer (at least at the beginning).
However, you might want the support, security, and fast update cycle that comes with going premium.
My advice for you at this stage is to use the free versions of premium plugins until you outgrow them. That way, you’re never paying for anything you don’t use.
Step 8: Write and publish the most essential pages on your blog
4 essential pages you need to include on your blog
Your visitors will come to your site with certain expectations; even if it’s a blog, they’re going to be looking for an about page, a contact page, and others that you might initially overlook.
Treat this next section as a checklist guide for the pages you should make next:
Home page
An optimized blog will always have its own home page — not just a list of the most recent posts.
See Problogger, for example:
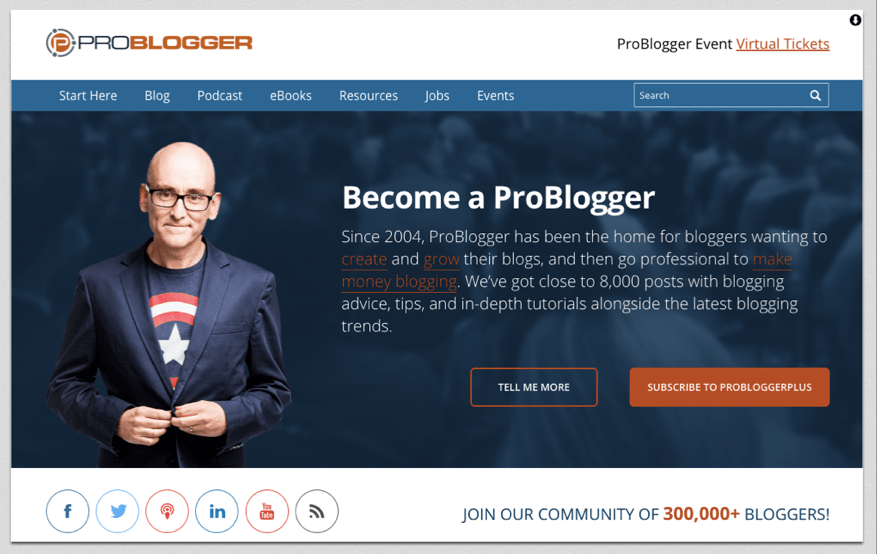
While there is a list of recent posts further down the page, the first thing the reader sees is a big call to action to subscribe to the newsletter.
A big chunk of your page views will be going to your home page, so use that opportunity to capture leads and show first time visitors what you’re all about.
Elements to consider including in your home page:
- A headline to inform visitors who you are and what you do
- A clear Call to Action (that’s an action you want users to perform), check out our homepage as an example.
- Links to the most important parts of your website
- Description of your products or services
About page
Your about page should be a description of you and your blog.
In many cases, the about page is one of the most frequently visited pages of a website, so you’d better make it hard-hitting, descriptive, and actionable.
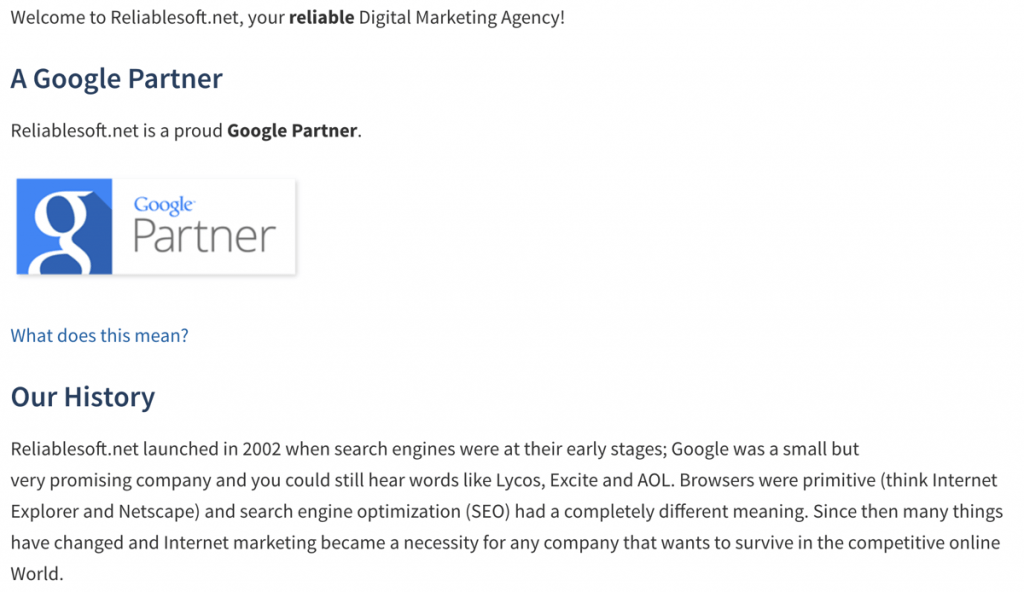
What you see above, it’s a screenshot of our about page.
Try to include all of the below in your about page:
- Good examples of the kinds of content readers can expect
- Your story: why did you set the blog up, and what are you doing with it?
- An image of you or your team
- A call to action
- Facts about you and your blog
Blog page
Since you should have a main homepage, it means your blog page will live one level deeper, on a URL like example.com/blog.
What should it look like?
A good way to answer that question is to look at the /blog pages of conversion-orientated marketers, and see what they’ve tested and come out with.
Typically, blogs are a chronological list of articles. That’s what readers expect, so it tends to be what they get:
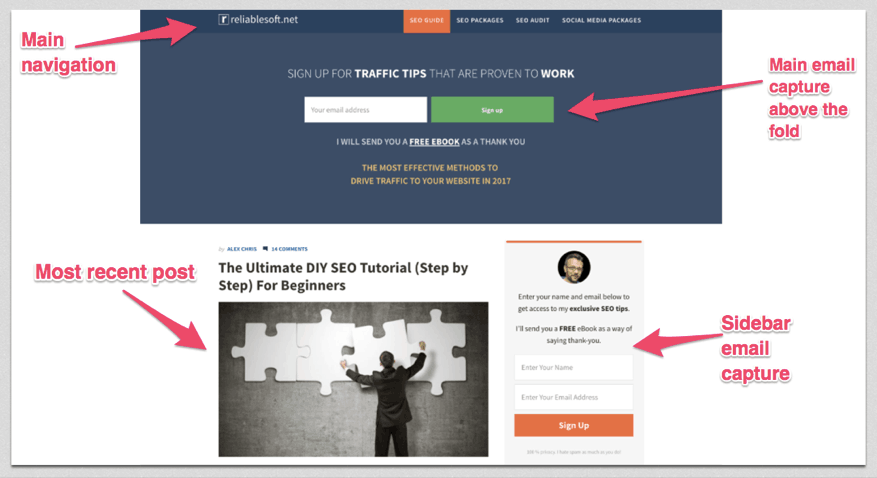
But, like any tightly optimized page, it should have visible email capture (opt-in) boxes as a basic requirement. Also consider adding:
- An ‘about’ widget: a condensed version of your about page with a quick bio and a photo
- A list of your most viewed pages
- Featured posts
- Categories
- Archives
- Social media buttons so your readers can follow you
Contact page
Depending on what your blog’s purpose is, your contact page could be your biggest source of income.
For people providing services, contact pages are where you must persuade the reader to get in touch. It needs to be well optimized and easy for the user.
For bloggers who primarily want to push readers to share, comment and subscribe, the contact page doesn’t need to be so purposeful — it just needs to be there.
Here is an example from Seth Godin:
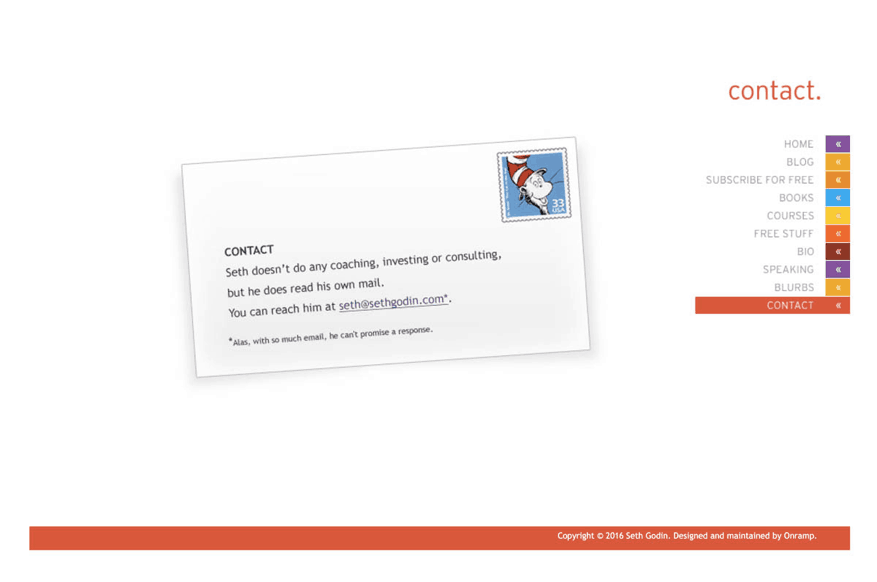
Seth’s not looking for anything in particular, but is providing a way to get in touch with him if you need to.
For blogs that don’t offer services, something like Seth’s page would be ideal.
He uses the page to show his email address, and add a little personality.
On your contact page, you should try to include:
- Your phone number
- Your email address
- A contact form
- Your physical address
- Reasons why the reader should contact you
- Your social media profiles
Step 9: Learn how to make money with your blog
How to make money blogging
Blogging is a great hobby, but it can also be your full time job.
It takes a lot of work to build a community and an audience, but when you have a big list of people to market to, you can generate a heap of passive income with Adsense, affiliate marketing, and selling your own products and services.
Here’s a brief explanation of each method:
AdSense is a Google product. For publishers like you, it’s a way to display advertisements on your site and generate revenue without putting in the effort to pick and choose which ads you’re displaying.
Once you install AdSense on your site, you select where you want ads to show, then set it (and forget it).
Your income depends on the keywords your site ranks for, and the amount of traffic you get.
To put it bluntly, if your audience is small, you’re going to get peanuts.
The bigger you get, however, the more likely you are to earn significant money from AdSense.
Rank organically for content with affiliate links
Most of the bloggers I’ve listed so far — Neil Patel, Pat Flynn and Darren Rowse — are affiliate marketers.
They make hundreds of thousands every year by writing content that sells other people’s products.
Here’s a rough overview of the process:
- Get in touch with companies that sell products related to what you blog about, asking for an affiliate partnership.
- Receive your own personal affiliate link that, when clicked, shows the company that you were the one who referred them a customer
- Write a high-ranking blog post targeting a relevant keyword, including affiliate links
- Get traffic to your affiliate links
- Get X% of the company’s earnings for each referral
Obviously, this is nowhere near as simple as it sounds. For starters, you need to know which affiliate program to join.
You need to learn how to write posts that deserve to rank highly on Google, build relationships with other companies, and learn copywriting to sell readers products.
These skills will all come in time. The more you write, optimize, and look at the data, the better you understand your audience and are able to recommend solutions that really solve their problem (and send you a bit of money each time, too).
Sell your own products and services
Establishing a blog is one step on the road to becoming an authority.
When you’re an authority, people will want to hire you and buy your products, giving you another revenue stream alongside affiliate marketing and AdSense.
You’ll know the problems your audience is trying to solve by the comments and traffic you get, so setting up a blog is like the first stage of market research for any products or services you might want to sell in the future.
Blogging about writing? You could sell an ebook full of valuable information from your own experience, or a video course of writing tips.
You could also put yourself for hire as a marketing consultant or copy editor.
Run a nutrition blog? You could sell a collection of recipes, or your services as a nutritionist.
Whatever your blog’s about, where there’s interest there’s also revenue to be made.
What will you sell to your readers?
If that sounds confusing, don’t worry about it now. Register to my newsletter (below) and I’ll send you a free guide on how to make money from your blog. For now, concentrate on building your blog content’s and traffic.
Step 10: SEO Optimize your WordPress Blog
To set your blog up to generate revenue, you’ll need to know the basics of content writing and SEO.
You’ll need to network, build links, build a social media following and write the top content in your niche that outclasses everything on the first page of Google.
Are you up to the task?
Yes?
Our WordPress SEO guide is your next step.
In it, you’ll learn:
- How to grow your traffic to more than 500K organic visits per month (case study included)
- SEO secrets you can use on any blog
- How to generate a ton of traffic while you sleep (for free)
- How to improve user experience and conversions
- The process of keyword research
- The what, why, and how of SEO’s most important element: link building
- How to make thousands of dollars from adsense
- How to quickly grow your traffic, without taking any risks
The guide is written by our Digital Marketing Manager that has more than 15 years of experience with WordPress SEO.
Packed with checklists, screenshots and actionable tips, this is the only SEO book you’ll ever need to read!
Good luck with your WordPress Blogging and remember: building a succesful online business takes time, it needs a lot of patience and hard work but it’s also one of the best jobs in the World!
0 comments:
Post a Comment